DIY Pallet Wood Wall
Adam Koons
Affiliate Disclosure: Thank you supporting us by visiting our site and posts. This website contains affiliate links that are ads recommended to you, that we can earn a small payout on. We only use Amazon Associates and Google Adsense. By clicking on these ads, making a purchase, or taking other action, we can earn a little extra money to fund future projects.
Reclaimed wood is being used more and more often in furniture and interior design. Using salvaged wood is often a cost-effective way to add a statement to any room or space. Through the imperfections and wear, pallet wood adds warmth to a room and gives a unique custom look.
We recently had an opportunity to add a reclaimed wall to a client’s living room niche. We used recycled pallet wood in the small media space around their flat panel TV mount. Pallets are a great choice for this type of project, because there are usually different species of wood, along with a variety of sizes. Our pallet wood was mainly pine, but there were some pieces of red oak, Douglas fir and poplar. The different species can add color and contrast to the design, and the varying widths give the finished wall a random appearance.
Our first step is always collecting discarded pallets. We usually watch the "free stuff" section of Craigslist, but we also have a few local business connections that like to have their pallets removed regularly. Throughout the entire project, separating all the boards, pounding out nails, and removing staples takes the longest amount of time. We've found that the easiest way to separate the boards is by placing a block under the board we want to remove and stomping on the pallet next to the board. Then, it just takes hammering on all the nails, and pulling them out.
After getting the pallets separated, we then use our jointer to establish a straight edge on the boards. Most of the time, the boards are very bowed and cupped, and there isn't ever a square edge. Next, we set up the table saw and rip all the boards to a standard width. I usually try to have 2-3 standard widths. On this project, we had 3”, 3.5” and 5” boards. Then, using a miter saw, we trim both ends square, in an effort to make clean butt joints for later on. Finally, we complete our preparations with a light sanding, using a random orbital sander. This removes the risk of splinters, and blends the wood with a more even texture.
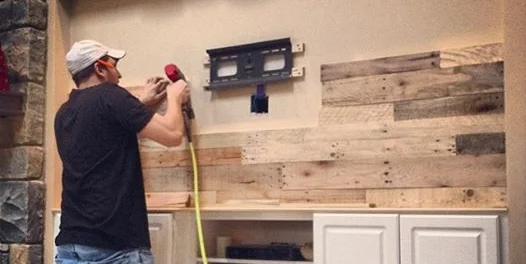
Once we are ready to attach the boards, we use Liquid Nails – Panel Strength and brad nails. An air brad nailer is the way to go here. I can shoot nails into these boards quickly and cleanly. The glue is designed to hold the boards, and the brads are there to keep the wood in place until the glue sets.
I like to attach long boards and then cut shorter ones to fit. I recommend keeping the joints separated, similar to a wood floor. Take your time placing the wood in just the right place. It is like a puzzle with no picture. However, careful time spent here will ensure a better look later!
We recommend blending the colors of the wood, and alternating the wood widths to add randomization. I like to run a few rows of thinner pieces, then a thick one, and then a few more skinny rows. In smaller spaces, having more rows looks better, but in larger spaces, thicker rows blend well.
Finally, the last step is applying varnish to seal the wood and blend it all together. I used a satin finish to leave the wood looking natural and rustic. Depending on the wood, it will sometimes take several coats to get an even look to the finish. The smell can be strong, but will usually go away in a day or so.
Overall, this is an easy project for the weekend DIYer. With a few people, you can complete the whole thing in a day, and enjoy talking about it that evening! (However, if you're looking for some help, let us know!)